윈도우10일때 시놀로지 나스를 통해, wol기능을 잘 활용해왔었는데,
메인보드와 CPU를 바꾸고, 윈도우11로 업그레이드 한 이후에 설정을 아무리 해도 wol이 작동하지 않았습니다.
몇몇 추가적인 간단한 설정을 통해 문제를 해결했고, 내용을 공유합니다.
현재 LAN카드는 Realtek gaming 2.5Gbe Family Controller 입니다.
전에는 intel LAN드 였는데, 랜카드마다 설정이 다소 다른것으로 확인됩니다.
** 기본적인 WOL 셋팅
A. 메인보드 BIOS 설정 (WOL 기능 활성화)
윈도우11에서 WOL이 작동하려면, 단순히 OS상의 설정뿐만 아니라 메인보드(BIOS/UEFI)에서도 전원 및 네트워크 관련 설정을 올바르게 구성해야 합니다. 아래는 제가 사용하는 ASUS 메인보드 기준이지만, 대부분의 제조사(BIOS/UEFI)에서 유사한 구조를 따르고 있습니다.
✅ 1) 고급 전원 관리 설정 (APM / ErP 관련)
BIOS에 진입한 후 다음 항목들을 확인하세요:
Advanced > APM Configuration
Power On By PCI-E 또는 PCI-E/PCI Device → Enabled
이 옵션이 꺼져 있으면, 랜카드에서 신호를 받아도 PC가 켜지지 않습니다.
Advanced > Platform Power / ErP Ready
ErP Ready → Disabled
ErP(Energy-related Products)는 유럽 에너지 규제 관련 기능인데, 이 옵션이 켜져 있으면 WOL이 차단될 수 있습니다.
✅ 2) 통합 네트워크 설정 확인 (Onboard LAN)
Advanced > Onboard Devices Configuration
Onboard LAN Controller → Enabled
간혹 바이오스 초기화 이후, LAN이 비활성화된 경우가 있으므로 반드시 확인 필요
Advanced > Onboard LAN Power On (해당 옵션이 있는 경우)
Enabled 설정
✅ 3) 전원 복구 옵션
Boot > Restore AC Power Loss
이건 WOL과 직접적인 관계는 없지만, 갑작스러운 전원 차단 후 자동 복구를 원하는 경우 유용합니다.
(옵션: Last State 또는 Power On 권장)
B. 윈도우 설정
3. 윈도우11 설정 (Realtek LAN 기준)
메인보드 BIOS에서 WOL 관련 설정을 마친 후, 윈도우11에서도 몇 가지 추가 설정을 해줘야 실제로 WOL이 정상 작동합니다. 특히 Realtek LAN의 경우, 일부 고급 전원 옵션이나 드라이버 설정이 다르게 적용되어 있을 수 있어 점검이 필요합니다.
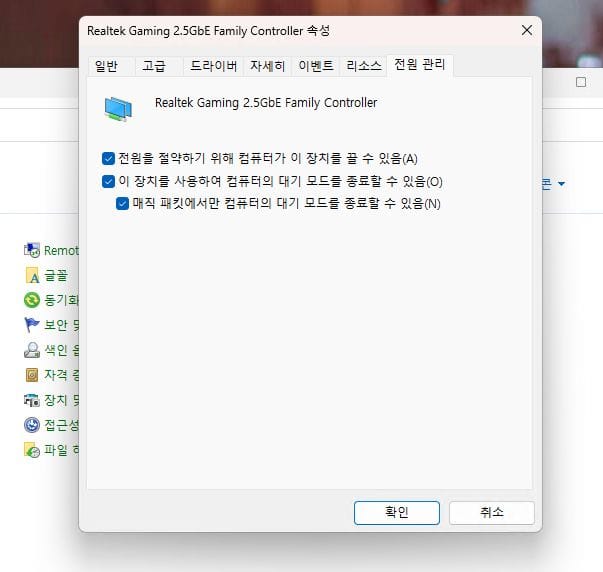
✅ 1) 장치 관리자 설정
Win + X > 장치 관리자(Device Manager) 실행
네트워크 어댑터 > Realtek Gaming 2.5Gbe Family Controller 더블 클릭
전원 관리 탭으로 이동
전원을 절약하기 위해 컴퓨터가 이 장치를 끌 수 있음 → ✅ 체크
이 장치를 사용하여 컴퓨터의 대기 모드 해제 허용 → ✅ 체크
고급 탭으로 이동
아래 항목들이 활성화되어 있어야 합니다. (없다면 드라이버 업데이트 필요)
나머지 설정을 다 하고 아무리해도 안되었는데 Green Ethernet, Energy-Efficient Ethernet 부분을 해제하고 나서부터 작동하기 시작했습니다.
항목 이름 설정 값
Wake on Magic Packet > Enabled
Wake on pattern match > Enabled (권장)
Shutdown Wake-On-Lan > Enabled
Green Ethernet > Disabled
Energy-Efficient Ethernet > Disabled
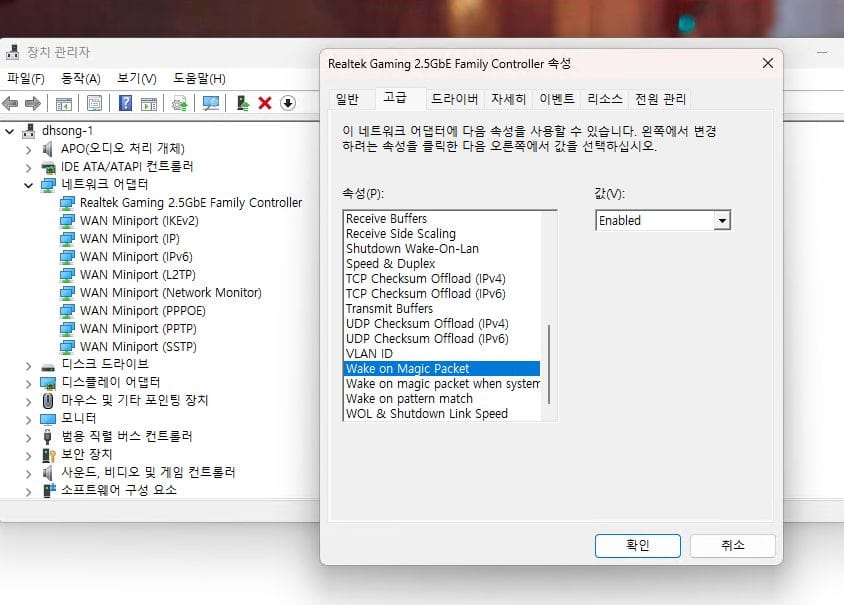
🔎 참고: 일부 드라이버는 한글로 표시될 수 있습니다 (예: "매직 패킷에서 깨우기").
✅ 2) 고급 전원 설정 변경
제어판 > 전원 옵션 > 현재 전원 계획 설정 변경 > 고급 전원 설정 변경
절전 > PCI Express > 링크 상태 전원 관리
→ 해제 또는 최소 전원 절약으로 설정
무선 어댑터 설정 > 절전 모드
→ 최대 성능으로 설정 (유선 LAN이지만 간섭 가능성 방지)
✅ 3) 빠른 시작 끄기 (Fast Startup)
빠른 시작 기능이 활성화되어 있으면, 완전한 종료가 되지 않아 WOL이 작동하지 않는 경우가 많습니다.
제어판 > 전원 옵션 > 전원 버튼 작동 설정
상단의 현재 사용할 수 없는 설정 변경 클릭
빠른 시작 켜기(권장) → ❌ 체크 해제

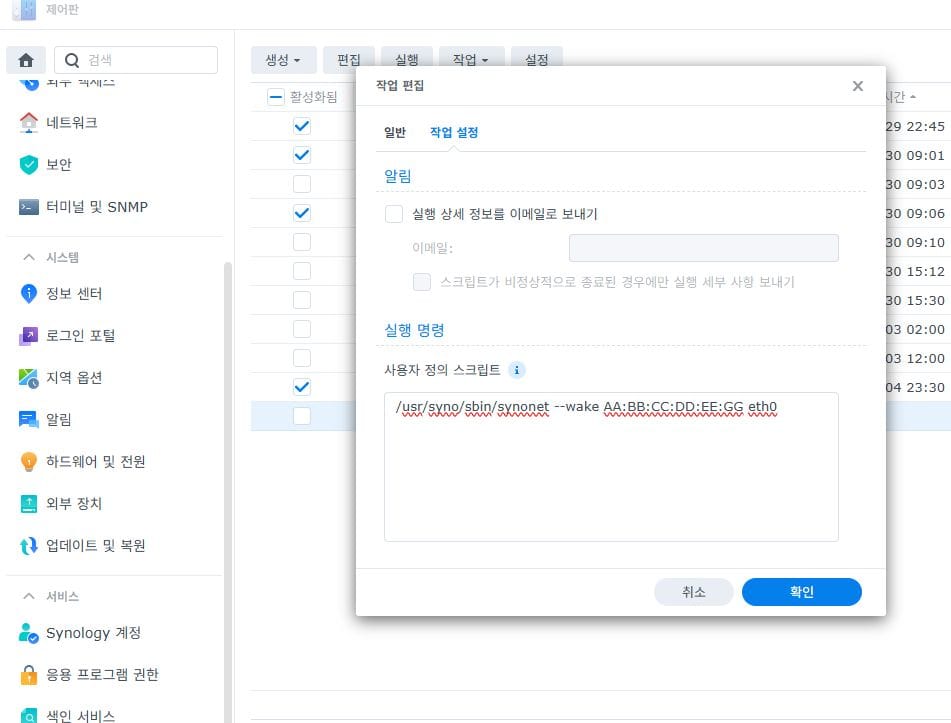
** 시놀로지 나스를 통한 스케쥴 등록.
제어판 > 작업스케쥴러 > 생성 > 예약된 작업 > 사용자 정의 스크립트
사용자 : root
사용자 정의 스크립트 :
/usr/syno/sbin/synonet --wake 맥주소(예시 AA:BB:CC:DD:55:33 ) eth0
작업 등록한 이후 실행하면, wol 기능이 활성화되어 PC가 켜집니다.
I used to utilize WOL (Wake-on-LAN) successfully through my Synology NAS when I was on Windows 10.
However, after upgrading my system — new motherboard, CPU, and Windows 11 — WOL completely stopped working, no matter what I tried.
After some research and trial and error, I found a few critical extra settings that solved the issue.
I’m sharing them here in case anyone else is struggling with the same.
Current NIC: Realtek Gaming 2.5Gbe Family Controller
(My previous board used an Intel NIC — note that different NICs have slightly different WOL behavior/settings.)
⚙️ A. BIOS/UEFI Configuration
For WOL to work on Windows 11, OS-level settings are not enough — you also need to properly configure your BIOS/UEFI.
These steps are based on an ASUS motherboard, but most vendors offer similar options.
✅ 1. APM / ErP Settings (Power Management)
Navigate to:
nginx복사편집Advanced > APM Configuration
- Power On by PCI-E / PCI Device →
Enabled
If disabled, your NIC won’t be able to wake the system.
Then check:
mathematica복사편집Advanced > Platform Power / ErP Ready
- ErP Ready →
Disabled
ErP (Energy-related Products) can block WOL from working if enabled.
✅ 2. Onboard LAN Configuration
Go to:
mathematica복사편집Advanced > Onboard Devices Configuration
- Onboard LAN Controller →
Enabled - Onboard LAN Power On (if available) →
Enabled
Sometimes, the onboard LAN is disabled after a BIOS reset. Double-check this.
✅ 3. Restore AC Power Loss (Optional)
mathematica복사편집Boot > Restore AC Power Loss
Not directly related to WOL, but useful for auto-start after power failure.
Set to Last State or Power On as preferred.
🪟 B. Windows 11 Configuration (Realtek LAN)
Once BIOS is configured, Windows 11 also needs a few tweaks — especially for Realtek NICs, which can behave differently from Intel ones.
✅ 1. Device Manager Settings
- Press
Win + X→ Open Device Manager - Go to Network adapters → Right-click your Realtek Gaming 2.5Gbe Family Controller → Properties
➤ Power Management tab:
- ☑️ Allow the computer to turn off this device to save power
- ☑️ Allow this device to wake the computer
➤ Advanced tab:
Ensure these options are set — if you don't see them, update the driver.
| Option | Value |
|---|---|
| Wake on Magic Packet | Enabled |
| Wake on pattern match | Enabled (recommended) |
| Shutdown Wake-On-Lan | Enabled |
| Green Ethernet | Disabled |
| Energy-Efficient Ethernet | Disabled |
⚠️ These last two are critical. My WOL didn’t work until I disabled both Green Ethernet and Energy-Efficient Ethernet.
✅ 2. Power Options (Control Panel)
- Go to:
Control Panel > Power Options > Change Plan Settings > Change advanced power settings
➤ PCI Express > Link State Power Management
→ Off or Maximum Performance
➤ Wireless Adapter Settings (even if using LAN)
→ Maximum Performance (to avoid unintended interference)
✅ 3. Disable Fast Startup
Fast Startup often interferes with WOL by preventing full shutdown.
- Go to:
Control Panel > Power Options > Choose what the power buttons do - Click Change settings that are currently unavailable
- Uncheck Turn on fast startup (recommended) → ❌
📅 C. Synology NAS: Scheduled WOL Script
If you're using a Synology NAS to wake your PC:
- Open:
Control Panel > Task Scheduler > Create > Scheduled Task > User-defined Script
Set:
- User:
root - Script:
bash복사편집/usr/syno/sbin/synonet --wake AA:BB:CC:DD:55:33 eth0
(Replace the MAC address with your actual PC's address.)
Once saved and executed, this script will wake your Windows 11 PC via WOL.